cooking with my preschooler…

image2

I can’t believe that my child is 4 years old!  It has been a while since my last post (years in fact).  I’m that person that constantly has ideas flowing through her head and has a very hard time focusing on one thing.  Since you’ve last heard from me, I have relocated BACK to Boston with my family, have returned to the kitchen professionally – after a stint at the amazing Delfina in SF as a server, expo, and food runner – (the world of baking and pastries this time), have written a few business plans, started getting back into ceramics, and I am in the works of starting my own “brand” – hence the name Maison Joy – that encompasses basically all things cooking and eating… including the tableware that the food goes on (more on that later as I get my Etsy Site up and running).

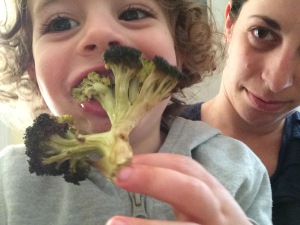
One thing though that hasn’t changed is that, despite the fact that I’m a super busy working mom (and wife to an even super busier working dad), basically every day I cook with my son.  I have been doing this for a while now and I really enjoy getting him involved with the process (whether it is measuring out ingredients, setting the table, planting and watering seeds, or helping me at the grocery store).  Getting your kids involved with cooking or the process of putting together a meal with not only help them appreciate their food more, but will help them to be more open to trying new things.  NOW HOLD on.  I’m in no way saying that he is a gem and is always cooperative or interested.  No way.  Sometimes B takes two bites of dinner and says he is done.  Sometimes he screams for cheddar bunnies for breakfast for an hour (as he did this morning).  Sometimes he wants bagels and lox and cream cheese and capers for dinner (which i’m actually ok with since thats what I mostly want for dinner too).  Sometimes he pulls all the food from the fridge and wants THAT for lunch.  Sometimes he eats the food off MY plate and says i can’t have any.  So, its far from easy.  He is still a 4 year old!

Anyway, so here we are again and hope it sticks this time.  I actually have a lot of great photos, recipes, and ideas lined up and ready to go for your pleasure, and I just thought since I know soooooo many people having babies right now, would share my struggles, triumphs, and food.

Enjoy!IMG_1062


Tricks and tips…

As Brooklyn gets bigger so does his appetite. I was thinking hard for weeks of a new way to freeze his food thar didn’t require me to pop out 3 to 5 ice cube tray portions every meal. I knew there had to be something in my kitchen already that would make this possible discovered a new trick… instead of using ice cube trays I use silicone cupcake molds to freeze larger portions. The frozen food pops out so easily. We use them for chunkier foods like chicken pot pie, curried lentils, and heirloom beans with kale. Once frozen just pop them out into a Ziploc bag The same as you would using ice cube trays. The cupcake molds hold about the same amount as three ice cube trays and fit perfectly in our dr. Browns snack cups. I still use the ice cube trays for puréed fruits that I use to mix into yogurt and oatmeal and puréed vegetables that I use as mix ins to other recipes as well.

20130410-205134.jpg                                 20130410-210131.jpg

=

Super Green Puree

This green puree is a great way to add some super greens into your child’s diet.  I love to add it to scrambled eggs, tomato sauce for pasta, legumes, polenta, and rice for an extra boost of green.  Kale and spinach are both super foods and the potato is really just there to help bind it together.  When frozen it gets a bit spongy but will hold its shape when defrosted… just warm it up slowly in a pan with a touch of water on very low heat and add it to your favorite recipe for an extra boost of green!

Green puree
(yields about 2 ice cube trays)

1 bag baby spinach, washed
1 head kale washed, thick stems removed, chopped
1 small yukon gold potato, peeled and diced

Put the diced potatoes in a pot of cold water and bring up to a simmer.  Simmer potatoes until soft enough to mash, then drain and set aside.

Next bring a large pot of water up to a boil with a pinch of salt.  Quickly blanch the spinach in the water until just wilted (less than a minute), remove from water (don’t dump out the water) and put right into blender.  Repeat the same process with the kale, but kale will have to cook for a bit longer, up to two minutes.

Once spinach and kale are in the blender, add about 3 tablespoons of the cooking water, or just enough to get the blender going.  Pulse blender, if it isn’t blending add a little more of the cooking water.  Continue to pulse blender until you can turn it on to a steady blend (if you are lucky enough to have a VitaMix this should be relatively easy!) Next add your potatoes and continue with the same process, pulsing until you can maintain a constant blend, and then puree for about 1 minute until smooth.  Transfer puree into ice cube trays and cover with parchment or plastic wrap and freeze

photo-7
super green puree to add a super punch to any recipe!

Homemade Chicken Stock – a staple for the kitchen

Chicken Stock
(yields about 1 quart)

Bones from 2 whole chickens – roasted until golden brown
1 carrot, chopped
1 onion, chopped
3 stalks celery, chopped
1 bay leaf
4 sprigs thyme
10 ea black peppercorns
Enough water to cover the ingredients (about 3-4 quarts)

IMG_0911

Put all ingredients in a medium stock pot. Simmer on very low (should look like a baby farting in a bathtub) for 3-5 hours or until reduced by 3/4).  Allow to cool to room temperature, strain, chill.

Should look like jello after chilled in the fridge overnight.  Always have homemade chicken stock in your freezer!

Pasta for breakfast, lunch, and dinner…

It seems like I’ve got a lot of pasta recipes piling up here, and a lot of you are probably thinking that pasta isn’t so healthy huh?  Well all I know is there is a whole race of people that probably eat pasta at least once a day and are doing okay for themselves (yeah they are called Italians).  When I was living with my ex’s Italian family we ate pasta once, twice, sometimes three times a day.  And sometimes that pasta was mixed with white beans and bread!  Carb overload!  I recall a period of time where I didn’t shit for at least a week!  TMI, I know.  Anyway I’m not telling anyone they should eat past for every meal, but when we love our Italian food, I don’t think twice a week is going to kill us.  Its quick, easy, filling, and nutritious if you do it right.

On my recipes page I have posted a recipe for my “super green” green puree.  This is a boost of green that you can add to any sauce or puree if your child doesn’t like their veggies (or even if they do!)

I love rotini pasta for this dish because the sauce is picked up by all the nooks and crannies between each twist.  Rotini is often sold under the name fusili in the grocery store, which it is not.   In Italy rotini is traditionally served with red sauce or pesto.

20130219-200128.jpg

Green and Red Rotini (fusili)
yields enough for you and baby

2 cups dried Rotini pasta
1 cup marinara sauce
1 cubes green puree
fresh grated parmesan
salt & pepper
basil

Bring a large pot of salted water up to a boil.  Cook pasta to desired doneness.  In a saucepan, warm up the marinara with green puree.  Toss the pasta into the sauce once it is warm, transfer to serving dish.  Top with fresh grated parmesan, diced basil, and fresh cracked pepper.  (For baby I cook the rotini until well done and then cut into bite sized pieces before tossing in the sauce)

Dinner for me…dinner for you!

Because my husband is a chef and works long hours late into the night, I am most often eating dinner alone.  I find when cooking for only myself it takes some of the pleasure out of the cooking for me (after all, half the fun of cooking is hearing the people you cook for’s nom nom noms as they devour your food!)  I try to pep myself up by cooking enough for two and imagining him coming home from a long night of work to a treat in the fridge… and if he doesn’t eat it… lunch for me, yea!  I always try to cook enough of what I’m making for leftovers, because not having to think about lunch or dinner the next day is such a timesaver.

Today though I’m cooking the same meal for baby and me!  The preparation will be a little different, but mostly the ingredients are the same.  So I cook dinner for me tonight and will have dinner all ready to go for baby tomorrow, as he doesn’t mind eating food room temperature, which is great.   Tonight we are making broccoli!

Don’t throw away those stems and PLEASE don’t puree your pasta!

When I was doing online research when baby B first started eating solids I came across so many people asking how to puree pasta, claiming that their pasta was becoming a gummy gloopy glob.  Well yeah.  So please don’t puree your pasta because that is what is going to happen.

Casarecce with Broccoli, Tomato, and Pesto
20130210-200103.jpg

2 heads organic broccoli (or not organic, whatever)
½ # Casarecce or strozzapretti pasta (you’ll see why I like this shape)
1pt tomatoes cut in 1/4
½ c. no nut pesto (basil, garlic, evoo, lemon juice, parmesan)
parmesan
salt & fresh ground black pepper

20130210-195842.jpg
prepped broccoli – small dice, rough chop, florets

First prepare the broccoli. Cut off stems, but don’t throw them away!  Cut the florets into baby bite size pieces, toss with a little bit of evoo, a pinch of salt and fresh cracked pepper, and spread on a baking sheet lined with parchment paper – makes for a super easy clean up!  Roast in oven at 400F until browned and soft for baby to eat.  Next rough chop the part of the broccoli between the thick stalk and the florets, because the skin of the broccoli is somewhat fiberous and hard to “gum” for baby, I use this part for myself.  The thick stalk you can peel and then small dice (aka brunoise) for baby and steam until soft.

While broccoli florets are roasting, get the pasta cooking. When pasta is al dente, reserve enough for two portions (and about ½ cup of the starchy pasta water) and save what you want for baby, putting new water in the pot and continue cooking the rest of the pasta for baby — you want to way overcook this pasta.  Strain pasta and rinse with cold water.  Cut into bite size little “s” shapes.

pasta "s'"
pasta “s'”
roasted florets
roasted florets

For adult portion – coat the bottom of a large sauté pan and place on high heat until oil ripples (just before smoking). Add the chopped stalks that you cut for yourself and sauté with a pinch of salt and fresh cracked pepper until al dente. Some carmelization is good here! When broccoli is ready, add the tomatoes and a splash of the pasta water and continue to cook for a minute or two on medium heat.  Next add your pasta and the rest of the pasta water and toss all together.  Turn off the heat.  Then add the pesto (reserve about 1 Tbs for baby).  Season with salt and fresh cracked pepper as needed and toss.  Plate and top with however much fresh grated Parmesan cheese you desire!

For baby portion – in a bowl add roasted broccoli florets, diced steamed broccoli, quartered (or smaller) cherry tomatoes,  pasta “s’”, and pesto in a bowl and mix together.  I just serve this cold or room temperature.

Enjoy!

-Cassidy

Soaking, sprouting, and fermenting oh my!


My nieces’ mother bought me a book called “Nourishing Traditions” a few years back.  To be honest (sorry Ashley) I never really took the time to actually read between the recipes until now.  I guess now that I have a lot of time at home, and new baby, I’m thinking more about what I eat. I’m finding it very interesting, yet at the same time it is totally shaking my world!  My head is spinning.  Apparently everything that I thought was healthy that I was eating is not?  I’m confused.  I though whole grains, seeds, nuts & legumes were good for baby and me?  According to the author, Sally Fallon, the full nutritional potential of these items cannot be absorbed by the body because they containe phytic acid (http://en.wikipedia.org/wiki/Phytic_acid) which prevents the nutrients from being absorbed.  By soaking, sprouting, and fermenting you are able to decrease the amount of phytic acid therefore allowing your body the ability to absorb more of the nutrients that are so good for you (calcium, iron, magnesium, copper, and zinc!)

I cook a lot with seeds, grains, and legumes (I really love lentils, chickpeas, quinoa, faro, barley, brown rice) but the only reason why I have ever soaked any of these items (and skimmed the nasty froth that appears when cooking which contains anti-nutrients), both at home and at work, is to help with cooking time.  I never stopped to think that it had anything to do with helping our bodies absorb the nutrients!

When I was cooking in NYC at the Mondrian Hotel, we had a delicious dish that I used to eat almost daily that was curried black chickpeas with autumn root vegetables.  We would soak our chickpeas in lime water (a solution of pickling lime and water) for 24 hours prior to cooking, and always drain and replace the cooking water once the water came up to a simmer and foam was skimmed off.  I never stopped to think why we did this.  I mean I understood that it improves the quality and taste of the end result, but I was never thinking about nutrition.  Many times when you are working in a restaurant you don’t stop to ask why you are told to do something a certain way (and many times when you do ask why, there is no answer except “because I told you to do it, that’s why”…meaning they don’t know why, only that they were told to do it that way!)

The thing that got me all shaken up was the section about soaking oatmeal.  I eat oatmeal a lot for breakfast, at least a few times a week.   I have never soaked my oatmeal though.  In the book, Sally Fallon suggests soaking oatmeal with a solution of warm water, salt, and either yoghurt, kefir, buttermilk, or whey for at least 7 hours at room temperature but as much as 24 hours.  I’m definitely going to try this technique out and I will report back the results (I’ve read that people after soaking their oatmeal can tell that their body absorbs it differently and feeling more full for a longer period of time).  But I just ate a bagel, lox, and cream cheese 🙂 so it will have to be another day!

Anyway if you want to read more about soaking, sprouting, and fermenting, and well anything about Sally Fallon and her challenges on nutrition, you can do some research on your own on her foundations website here:
http://www.westonaprice.org/ and check out the book “Nourishing Traditions”… there are actually some good and easy recipes in there too!

–Cassidy

mmmm… pancakes

IMG_0686

When my brother (big B#2) and I were growing up it was Sunday pancakes was a tradition.  It was our dads “thing” to either cook pancakes in the morning, or in the summertime, would take us out for pancakes (and the occasional bacon and sausage which usually wasn’t allowed by mom!).  We spent our summers as kids in Ocean City, MD at the Breamer where we had our summer condo.  Our favorite spot for pancakes was the Seahorse (I think) across the street from the condo and going there was such a treat.  If my memory serves me correct they had the BEST every buttermilk pancakes and fake syrup, which may be why to this day my guilty pleasure is fake syrup…please don’t tell!

Anyway, I hope to bring that same tradition to our house (although big B has yet to make the pancakes, one day).  As for now, I’m making buckwheat pancakes.  I’ll probably make my own mix next time, but as a timesaver I bought a mix… the particular variety I chose is not gluten free as it has a mix of whole grains including wheat, but I do know that there are gluten free options out there.

IMG_0679

You can make a whole batch of silver dollar size pancakes and pop the rest in the freezer… or eat the rest yourself!  Just pull them out the night before to defrost and pop them in the toaster on low as if you were reheating waffles (in fact buckwheat waffles are another favorite in our house).  I love to spread apple, pear, or prune puree on the pancakes before cutting into bite size strips.  You can also add anything like blueberry, banana, roasted apple, roasted pear, or even chocolate chips for older kiddos!

you would think…

You would think as a chef that I would have no problem not only feeding my baby 3 wholesome healthy meals a day, but also myself.  This is NOT the case.  First of all, I have spent many years working in french kitchens…the french love butter and salt — not so good for baby.  Not so good for mommy trying to not still look like she is 8mo pregnant.  Most of the other time I was working in Italian/Med. inspired restaurants doing things such as breaking down fish and making fresh pasta.  As much as I love breaking down whole fish and making fresh pasta, its not really what I want to spend my time doing (nor do I have the ability to stand in the kitchen for hours while baby B is pulling at my pant leg, whining).  Many days, like yesterday, I find myself going until dinner time (usually 7:30pm when baby B is snug as a bug in his crib) without eating.  Ugh!

Gone are the days where I have washed, cut, prepped, ready to go food at my fingertips.  So you see, it may be more difficult for me because I’m not used to feeding myself.  Although in thought I could have eaten anything my little heart desired, that was never the case.  Maybe a chicken wrap or a bit of rice would suffice.

and the baby calls….

squash and pasta curls

Now that little B is pretty much all finger foods (we try to squeeze in some spoon fed stuff once in a while usually at breakfast or when we are out because finger foods are such a mess out of the house!) I’m really struggling with getting great EASY ideas for healthy finger foods.

I recently found, at my local organic market,  “veggie curls” which are a quinoa and corn based pasta (gluten free) with added beet, spinach, and bell pepper powders.  Im sure they aren’t any healthier than regular semolina pasta, but I like to vary the type of grains that we feed him, so this is just a great way to change it up.  Plus the size and shape of this pasta are perfect and I don’t have to do any cutting.  The little curls are so easy to pick up.  I have a lot of puree cubes left in the freezer so I’m looking for creative ways to use them up and this one is great.  I just toss the pasta with a couple of defrosted squash puree cubes (you could use any vegetable you want, or even mix a few together!) as the “sauce”.

IMG_0713

For the squash puree — no need to puree anything!  This is the easiest to make.  Whatever type of squash or pumpkin you prefer, split in half, scoop out the seeds, and  place in baking dish skin side up with about 1/2 inch of water and cover with foil.  Roast at 350 deg.F for about 45 minutes or until very soft (depending what type of squash you have may need more of less time).  When ready, remove the foil, and  Allow to cool until easy to handle.  The steam trapped between the flesh of the squash and the skin will make the skin pull off from the squash so easily as the squash cools.  Once it is cool, you can just peel of the skin and then scoop the flesh directly into ice cube tray molds and freeze.

IMG_0665IMG_0664